
In the piano, we made 1 and 88 leveling samples first (where case parts are at hand to consult) and then turned up their Keysteps to make them bedding samples as well. Pre-setting the height for those two keys means that when leveling is done, they will already match the rest of the keys and not need touching up. Convenience and efficiency. Two good reasons for setting these samples in the piano and two good reasons for taking them to the bench to level the keys. There, enjoy better light. A better height. Easier access. And no need to shift the action out of the piano, punchings precariously perched on the keys for insertion.
There may be circumstances when clip-on leads pay their way, but they are not the real weight that will be on keys and keyframe. And they require time to install (including time to remove the topstack). Also, they can soil backcheck coverings and have a tendency to fall off. All together, they are annoying, ineffectual, and ultimately, inefficient.
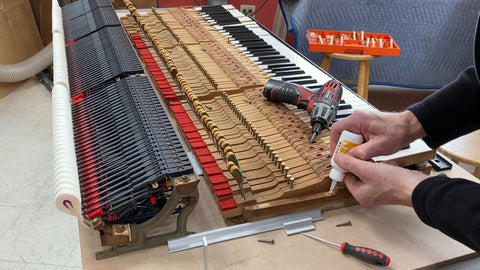
Just remove the topstack, 10 or 12 screws backed out and screwed into a business card (to keep in order). This takes minutes. During the first round, glue reinforce the topstack bracket screw holes. A few drops of medium CA glue in each hole, followed by a quick insertion and removal of the relevant screw, insures the holes hold up.
Also, after the first round is a good time to take care of too much friction (impedes proper positioning - the worst of this will have been dealt with in the piano before bedding and sampling) and too little friction (inadequate positioning stability - hard to regulate a moving target). The job of leveling keys is to optimize and stabilize key position for play. Treat compressed bushing cloth with a drop of Dampp-chaser humidifier treatment (a powerful surfactant) or VS Profelt followed by sizing with a heated caul. Or rebush. Do the keypins need polishing, or replacement? Scale creep can easily happen while trying to solve these challenges. Fine. Just be open with self and customer about costs and benefits. Some prep may be important for good results.
A backchucking key, in particular, is a moving target for the regulator (and then for the player). And backchucking, once started, will get worse with playing. Atmospheric change will swell or dry the whole key, self-compensating into little change for the balance hole's fit on its key pin. However, very thin hot hide glue soaks into the area of the hole, swells it relative to the key around it, and hardens. And extra applications further the effect. Over half the keys in this action had "pulley" symptoms. The third round still left three keys loose but after the fourth, they fit.

Tight balance holes are also a problem. Even when eased, there can still be tightness from the wood the holes are in being too thick (the balance mortises too shallow). The tool shown above at the bottom scrapes material away. I place the keys on a metal plate so the tool bottoms out exactly the same for each key. Evening out these erratic balance hole depths made a big difference. These adjustments don't take long and stand the leveling in good stead. We must try not to get in our own way. Often, none of this extra work is needed, but when it is, take care of it and charge extra as needed. I calculate my fee from the beginning to accommodate inevitable extras, but when it stretches beyond that, I talk to the customer.

With bedding on the bench matching in-piano bedding, our leveling sample keys will support the leveling straightedge at the right height for leveling the naturals. I have long recommended adding Keysteps to support the outermost sharps for their leveling, and this works. But Ben Rocke has come up with a pair of simple blocks, each having five levels between 15/32" (12mm) and 1/2" (12.7mm). Using cut punchings to prelevel the sample sharps to their best height, support the straightedge to match with Rocke Blocks placed on Keystep-supported 1 and 88. Their height can be refined if necessary with balance punchings. Shown below in-piano: keybed supports keyframe supporting Keystep supporting key supporting Rocke Block supporting straightedge. This makes no-play pillars of support for accurate leveling. As shown in the lead photo, level both sharps and naturals in each pass.

A simple trick to facilitate the leveling: Glue a pair of each size balance punchings to the sharpened end of a popsicle stick (tongue depressor). Glue one to each side so they join to provide a gauge two punchings thick. Since a given size punching will raise the front of its key approximately twice its height, these offer a quick test to come very close to the perfect choice every time without overstepping it. This method is particularly useful for estimating larger spaces. Start with the largest size punching needed, placing them on their keys, and proceed to each finer size. Removing punchings that overreach annoys and wastes time.

Between each round, square and space the keys. I use a strip of maple or other hardwood and a small hammer to tap both front and balance pins into place. I choose a strip thin enough to reach under adjacent keys and over neighboring key pins to nudge the target front pin. This method will not chip or nick pins. If a key is too high on its balance pin, be careful not to slip and damage the button. Having initially set keys correctly to keypins and case parts, however, this should not be a problem.
Next week: Hammer Prepping Off-Rail and Pinning
(Index of all articles in this series)